3.31.2013

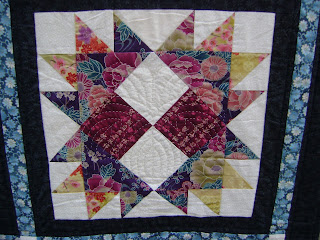
Japanese Beauty Quilt

Once upon a time...That's how all the good stories start, right? Well, I'm not sure how great of a story this is, but it has a great ending. 


My senior year in high school my friend Joanne and I took a quilting class together with her mom, grandma and another friend of our's. The class was through The Quilting Corner in Concord, MA. It was a block-of-the-month club where we would go each month and get the fabric and pattern for a new quilt block. If we came back the next month with our block finished, then we got all the stuff for the next block. It was a fabulous class and I really enjoyed it. They have a theme each year and the year we did it the theme was "Road Trip" and the colorways were inspired by a trip to different countries. At the beginning you picked what country theme you wanted: Tahitian, African or Japanese. Joanne and I both chose Japanese. 


I finished all my block and then for a long time they just sat. And sat. And sat in a bag in my room. Eventually I decided I was going to finish this quilt before I headed out on my mission so I figured out a setting for my blocks and bought all the fabric and batting I needed to finish it. I got the quilt top together and then it sat. And sat. And sat for another few years. 

Well, after graduating college I decided that finishing projects that I had all the materials for was a worthy goal so this quilt was on the list. I got It basted and did some straight quilting alongside my sashing strips, but then I hit another rut. My quilting lines were rather far apart and I was worried they wouldn't hold the quilt together right. I wanted to do something in each block but I didn't want to detract from the patchwork. 


Intermediate story: When my sister Christina got married she had a Chinese wedding. I made her dress. As a thank you, she gave me a book about Japanese quilting. (I know, different countries, but we didn't mind.) I have had this book for many years but never really used it even though I wanted to. I just needed the right project. End of intermediate story.


And then I found it! In the book, there were many patterns for sashiko, a traditional Japanese stitching technique that is both functional and beautiful. So I decided that I would stitch a Japanese family crest onto each of the quilt blocks in a somewhat sashiko style. I tried to match each crest with either the block's pattern or the fabrics in it. And of course, in my traditional "this has to be a lot harder than it ought to be so it turns out really cool" fashion, I hand quilted each crest. I had a hard time figuring out how to mark the designs and I ultimately found water-soluble interfacing that I could trace the designs on and then baste it to the block and stitch right through it. After I finished the quilt I gave it a good rinse and the interfacing washed away leaving my stitches behind.


The moral of the story is, this quilt it finally finished! Pieced, quilted, bound. Done.

And here it is (with my husband's slipper poking out from the bottom)


It's kind of a long story to tell, just to show pictures of the finished quilt. But I feel like you need to know how long this quilt has been waiting around half finished to appreciate the fact the it is now, indeed, finished.


7.16.2012

Hat Class Part I: Black Bonnet

So, back in Winter semester I took a hat making class. It was pretty much as awesome as it sounds. I don't really have too much to say about the class itself, so we'll just get down to the pictures.

My first project was to basically resurrect an old hat. So here's my nasty black bonnet before I started to do anything to it.


Not the best picture taken by mankind, but once you ponder on how difficult it is to photograph black velveteen, you begin to understand. With or without flash, it still doesn't do it justice. Hopefully however, you can see how crumpled the hat is. There was also wire poking out all around the edge, there were some weird not-quote-holes in the fabric, and then that weird ribbon in the back giving it a funny shape. Not to mention the lining of the cap is shredding out.

So I went to the store and got some supplies with which to remake this poor little hat.


Three kinds of ribbon, thread, beads, a flower pin/brooch from my grandma, and of course, a feather. Because everyone should own a hat with a feather in it, right?


I washed it so the fabric wouldn't be so gross and some of the weird spots where I thought the fabric had melted went away. So I guess it hadn't melted after all.... Then I brushed and brushed and brushed the velveteen so it would look pretty instead of matted. That took pretty much the whole 3-hour class period just to brush it. 

Then I started to disassemble the hat. I knew there was too much wrong with the foundation of the hat and so I had to take it apart to re-create the foundation. Here are the brim and cap separated.


And here you can see the pieces that formed the foundation of the brim. On the left is the velveteen which I reused. On the right is the buckram which I replaced and on top of them is the wire which I also replaced. It was too much of a hassle to try and unpick all three rows of stitching holding the wire in place, so I just cut it off the brim.


Here's my new piece of buckram with the wire stitched around the edges. I could only find fairly thin buckram so I ended up adhering two pieces together to give it more body.


I covered the buckram with the velveteen and stitched a grosgrain ribbon around the outside edge of the brim. I relined the cap with a heavy satin and stitched it back to the brim. I also added a new sweat band, but you can't see that here.


And here's my hat, all back in one piece! Doesn't it look a thousand times better than before? Seriously. It was such a big transformation. I don't think this picture does it justice. Once the hat was all together it was time to add some trimmings! I was somewhat inspired by the bonnet Lizzy Bennet wears when she and her aunt and uncle tour Pemberley in the 1995 BBC Pride and Prejudice. I tried to find a picture and failed. So you'll just have to go watch the movie if you are curious.


I made a ribbon rosette with my sheer, wired ribbon, added a black yo-yo and pinned on the vintage silver pin my grandma had given me for Christmas. The pin is just pinned to the yo-yo so I can take it off and wear it or put it on a different hat if I need to.


Because of the shape of the cap, I coudn't get the ribbon to lay flat against it. so I decided to pleat it instead. I think it adds some fun personality to the hat. After I sewed that on, I sewed on some ribbons to hold it under the chin, finagled the feather on there somehow, and then placed my rosette and I was done!!


A job well done, if I may say so myself. 
(Sorry the picture quality isn't better!)


6.26.2012

The Skirt Of Many Names

The Four Hour Skirt: because that's how long it took me to go from drafted pattern to finished skirt.

The Maxi Skirt: because that's what it is!

The "I Give Up Skirt:" you know, the skirt you can wear when you haven't shaved your legs in a few days and you're still expected to look semi-decent even though you don't feel half alive.

The Mermaid Skirt: this is the name my husband has given it, because he thinks it makes me look like a mermaid. Maybe I should make myself a seashell bra next?

Here's this skirt of many names in all its glory


I made up the pattern myself.

I wore it to a Relief Society activity and had a number of sisters ask me where I bought it. One of them even asked me if I would make her one!

And this is why I sew.

6.08.2012

Why My Husband Is Awesome

Well, there are a lot of reasons, but here's a really good one.

My dear husband is not a fashion aficionado. He wears clothes, but doesn't care much what kind of clothes they are (as long as they're not girl's clothes. And they should be comfortable. And not make him look like a gangster.)

So there we were today, chatting about some needed updates to his wardrobe when he comments that for the sake of our budget we probably shouldn't buy Armani clothes.

Wait, did he just mention a designer by name!?

Yes, yes he did. I got kind of excited.

He remembered Armani's name from a discussion earlier about my "Armani shoulders." And that's why my husband is awesome. Because he remembers things that I care about. Even if he doesn't.

6.03.2012

Go Sox!

Once upon a time, I had a Red Sox shirt. It was one of those ringer T-shirts where the body and sleeves are white and then the neck and sleeves are bound with navy blue ribbing. And it had my favorite logo on it; just the Sox. Eventually the shirt grew to be too small. It was a sad day. But when you're showing a good 8 inches of undershirt beyond the hem of your T-shirt, it's time to move on.

I couldn't quite bring myself to bring the shirt to Salvation Army or to give it away. I liked the logo too much. So, like a true crafter, I cut the logo off the shirt and told myself I would find a project to use it for. And there it sat in my fabric stash for a couple years. Waiting. Until this project came along....

This Spring term I look a knitwear and swimwear class. I decided this was the time to make use of my saved logo. So I bought me some navy blue and white interlock and made a new Red Sox shirt. A navy and white raglan baseball shirt (fitting, right?) which I sewed my logo onto. It turned out pretty snazzy if I may say so myself. Why don't you take a gander and tell me what you think?

Snazzy, right?

Here are some of the details.

A blurry picture of the vents. I found a stitch on the sewing machine that looked like the stitching on a baseball (it's called a faggoting stitch, it's a decorative applique stitch) so I used it to sew up my vents. You can also see my awesome double needle work on the hem where I used blue and red, because that's a lot more exciting than topstitching on white in white.

Here you can see my less-than-amazing skills at zig-zagging on the logo. You can also see the color difference between the old silk screen and the new interlock.

Another look at my awesome topstitching and the neckline.

If I use this shirt pattern again, I'll probably adjust the armhole depth some (it's a little breezy under there). But the length is just right, after I added two inches to the original pattern! I'd also like longer sleeves, but I didn't buy enough fabric, so I'll have to be more careful next time! All in all, I'm rather fond of it.

So there you have it. A project finished. Check.